Thursday, December 27, 2018

Ham Radio is not dead.

Here we go again.

Posted on March 26, 2018, was an article called "The Reality of Amateur Radio 2018." The article was penned by Chris G7DDN.  Here is the link to the article.

Here are some quotes from the article:

"The reality though for perhaps the majority of Hams on a day-to-day basis in 2018 is not so rosy."

The author goes on to describe how for most hams live with so much man-made interference that they live with constant S9 or above S9 noise on some bands.

"Then we have the Home Owner Associations coupled with the newer restrictive covenants that stop us putting up antennas, whether it be an 80 metre long wire or a 60 foot high tower. We have neighbours complaining about eyesores and about interference from “that Radio Ham” up the road."

Or this quote:

"Then we struggle with the fact that we are perceived, rightly or wrongly, as being old-fashioned, fuddy-duddy and out-of-touch."

The author does go on to seem to make an argument for the acceptance of internet-based ham radio as the possible salvation for hams that are faced with difficult antenna rules and local interfering noise.

So let's talk about that.

I do not believe that life for the "majority" of hams is not good.  I do believe that we make choices and decisions that are trade-offs based on our life circumstances.  For example, the XYL wants to live in a certain neighborhood.  That neighborhood may have lot sizes that are not conducive to putting up an 80 foot tower.  So we make trade-offs.  We find other HF antennas that will work with what we have, or we make the decision to NOT move into that neighborhood.  Decisions are usually based on compromise, especially when it comes to family, and most hams have family to consider.

That does not make the majority of hams SAD.  It is a choice to accept what is available, or to change your circumstances.

In my case, I have room for an 80/40 inverted vee (shortened on 80), and a 4 element tri-band yagi, and a vertical.  Not too bad, and I also have satellite gear and antennas.  Is this ideal?  No, not by any means is it my dream station, however, it works and I also get to live in the neighborhood that I like.  Of course, I told the XYL that when we move, it will be to a place where conditions will be more ideal.  A place with room for a 160m antenna and maybe a taller tower or even two.  That is also a choice.

Let me skip to the third quote above wherein we hams are considered old-fashioned "fuddy-duddy and out-of-touch."  To quote Clark Gable, "frankly my dear, I don't give a damn."

There is no way in H**L that I am going to care whether some guy who has the technical knowledge of a gnat cares whether the guy down the street is a nerd.  Nerds rule.  Therefore, I do not consider morse code or talking on HF to be old-fashioned at all.  I do consider these pursuits as manifestations of excellence in classic communications.  To make an analogy, should we ditch Mozart and Mendelssohn for 2018 hip-hop music because the classics are "fuddy-duddy?"  Yeah, well I don't think so.  Hip - hop makes me want to pull my ears off.

Being apologetic for practicing a magnificent art called amateur radio is just dumb.

The idea that homeowners associations are impinging on our hobby is absolutely true.  However, I have the freedom of not moving into that place.  Like I mentioned above, hams need to prioritize, and I want my freedom to put up whatever antenna I want.

Finally, embracing internet-based radio is a lovely idea, but it isn't ham radio in my opinion. Here's why.  Radio is by definition WIRELESS.  Don't get me wrong; as I write this it is somewhat lightning and thunder here in Israel, and I have my HF stuff unplugged.  So to get on D-star or Allstar or DMR is a nice alternative to HF on a day like today...but it isn't wireless communications.  I don't keep a log of my D-star contacts unless I met someone interesting and I will maybe want to contact him by email in the future to make a sked to work him on HF or VHF, or UHF, or Satellite.

The thing is, I don't want my amateur radio to be dependent on an infrastructure that is run by Google or Oracle or whoever else is responsible for the backbone of the internet.  If I have to, I can run my rigs off a battery and talk to my ham friends in the UK or Japan or the USA with no strings attached.

We hams need to preserve that because it is who we are and where we come from.  The internet is a plaything, but wireless ham radio is the real deal.

73   Mark 4x1ks


Thursday, December 20, 2018

Hit me with your best shot baby...

Sunspots got  you down?  Having trouble being heard?  Feeling inadequate?

That can happen when you are running your little QRP rig, even if you have a good antenna.  However, there may be a cheap fix that will put some "boots" to your mini signal.

Introducing a tiny little amplifier that will pump up your QRP transmitter like Arnold working you out at the gym.


70 watt amplifier parts

Check out the parts all laid out.   You have two unidentified final transistors (they have their faces buffed off), transformers waiting to be wound, 2 SMA connectors for your input and output, and the advertisement that this amp will put out a maximum of 70w.  The cost of this amp?  About $17.  That's correct, if this claim of 70w holds true, then you will take your QRP transmitter and make that little mouse ROAR.

So the proof is in the pudding, and this amp kit which I just received in the mail is still just parts in the bag, however, there are some youtube videos of these amps built and putting out power, albeit, not the 70w that is advertised, but still, significant power.

Think about it this way, my Ten Tec Century 21 "novice" rig has an input of 70 w max.  Output power is about 40 watts due to the fact that I recently swapped out the old monster capacitor for a new one.  That 40 watts from the Century 21 is plenty to be heard.


Ten Tec Century 21 70 watt input transceiver 

The issue with using the amplifier above as an add-on to a QRP transceiver is the need for a relay circuit.  You need to key the amplifier BEFORE you start pushing RF out of your QRP transceiver.  As I mentioned in a previous blog, with my 140 watt amplifier (AN-762), I built a 2 relay (SPDT) to switch the amp prior to the RF hitting the amp from the exciter (in that case the exciter is an Elecraft K2).

So now you have your two options for an exciter.  1) a QRP  Transmitter which will allow you to switch on the amp the old fashioned way with a TX / RX manual switch  or 2) using a T/R circuit like the Versa T-R mentioned in a recent blog here.

Which do you choose?  Well that depends on your skill level and your desire for a "commercial" style rig.  There is NOTHING wrong with using a manual TR switch.  You will use a DPDT switch to switch over the input and output of the amplifier as needed between transmitting and receiving.

Hams have been doing that for 100 years, and it works just fine.

What is the point of adding this amplifier, or any amplifier to your QRP rig?  The answer is self-evident in that sometimes that 4 or 5 watts just ain't gonna get the job done.  In about 6 or 8 years from now, you will be working the world on 1 watt, but right now we have what we have.

In the next few days or weeks, I will be building the little Chinese (claimed) 70 watt amplifier.  When it is ready, then this blog will give you an opinion as to whether the amp is able to really get the job done, and if it has a clean output.

KEEP IN MIND, with this kind of power output, you must provide a 5 or 7 element low-pass filter for each band that you are going to work.  There will be some losses, but they won't be detrimental.

If you are interested in buying this $17 amplifier, then look on ebay and/or aliexpress, and you will be able to search around for one with free shipping as well.

One last and very important thing is that you must provide a heatsink to keep from cooking your final transistors.  There are appropriately-sized heatsinks on aliexpress.  You MUST use heatsink compound to create a thermal bond between the transistors and the heat sink.  The heat sink will need to be big enough to do the job.


Completed 70w amp with aluminum heatsink

The aluminum heatsink will need to be about 50mm x 100mm...maybe a touch larger, and should be fairly thick with cooling fins as seen in the picture below.


A 100mm x 50mm aluminum heat sink is more than adequate

The bias voltage needs to be set for 2.7 v.  This will be discussed in a later blog.

There is no real limit on how pretty you can make your little amplifier look.  You can add nice lettering on the faceplate of a custom cabinet along with a volt/ammeter.  The sky is the limit in terms of how fancy you want your finished product to be.

So that is it for now, next step:  building it.

73, Mark 4x1ks


Monday, December 17, 2018

Bye Bye Quartz Crystals!!!

Well, here we go with a new integration of old and new.  Raise your hand if you are finding it unnerving that you cannot find crystals of the appropriate package style and frequency for your magnificent ham radio project.
image from www.theblacksheeponline.com

Like me,  you scout out all the hamfests, etc. and still you find it difficult to find that nice crystal you are looking for..the one that will fill in that gap on the 20m band that is making you insane!

A friend of mine goes to Friedrichschaffen annually (the biggest hamfest in Europe probably), and has failed to find the crystals I have been looking for.

So, in my midst of shelving my hopes of ever being able to find that perfect, crystal, along comes a solution to my problem that may just turn out to be AMAZING.

Let's just take a quick and melancholy second to realize that there are no more crystal manufacturers in the USA.  You can look up the history.  When I was newly licensed decades ago, you could build your W1FB Doug DeMaw (sk) QRP transmitter, order your crystal from JAN or someone else, then plug in your crystal when it arrived, and THEN....and THEN....get on the air and make those precious QSOs with your homebrew rig.  It was AWESOME!!


1.5w crystal controlled "Little Joe" for 20m on a piece of polished olive wood

If you have built anything like this, then you know the joy of making those first QSO's with your new rig.  However, building it today, requires a search for the right crystals.

Well, some clever enterprising hams at hayseedhamfest.com came up with a substitute for crystals using the RAN Technology Four Channel Oscillator Board (KIT).

RAN Four Channel Oscillator Board

Simplistically speaking, this board allows you to plug in 4 different pre-programmed chip oscillators (which are available from Digi-key).  The board kit is $16.50, and the chips are under $5 each.  That means for about $40, you will have a board with 4 different value crystal substitutes.  Take the board, integrate it into your transmitter, and you can now choose between 4 different frequencies.  And,...if you like, you can order additional chips to add more frequencies.  Digi-key programs the chips to the frequencies you order.

Considering that buying fundamental crystals for $7.00 is ancient history, well...this little board could be the answer to having an entire band covered and ready to go with you little transmitter.


The Digi-Key (Epson) programmable oscillator chip

In a few weeks, the oscillator board will be up on my workbench and then installed in a transmitter for testing.  I will attempt to give a review of how well it does the job as an add on to a few of my home brew QRP transmitters.  Hopefully it will be a big success.

Keep in mind, that because the chips are programmable (by Digi-Key upon ordering. Chips are not re-programmable..it's a one-time only deal per chip), so ANY receiver project, or any other project requiring stable crystal-type oscillators will be a candidate for this board / chip.

I will keep you posted on the outcome of the chips and board.

Link to board internet page is HERE

73 Mark 4x1ks


Thursday, December 13, 2018

Be COOL my little friend....

As I sit here writing this, I am pondering my nasty cold that was a gift from my son-in-law.  The nasty Cold is a segway to keeping cool.  Not much of a lead-in, but I'm not 100% on my game right now anyway.

Today I would like to briefly mention the amazing little known and easy to use KSD9700 Thermal Switch.  Doesn't that sound SOOOOO exciting??!!

Actually, when you have an application for these little switches, you will be very excited. So let's just do a brief summary of what we are talking about.

Many of us have switches on the brain.  We have relays, transistors switches, switches operating from light sources, verbal switches that operate by voice commands to a Smart Home device, and on and on.  Once in a while, you need a switch to manage heat and cold.  This is when a thermal switch comes into play.


KSD 9700 Thermal Switches 

So here are some KSD 9700 thermal switches.  They are versatile and come with two main features.  


1) the operating or actuation temperature
2) the operating condition (i.e. normally open or normally closed)

The operating temperature ranges from 40 degrees C to 130 degrees C, and maybe even higher.  That means that once the operating temperature is reached inside the switch, then the switch will throw to its closed position, or the other way around depending on whether you buy a normally opened or normally closed switch.  READ on...

The operating condition is simply whether the two leads are in continuity normally (normally closed), or not in continuity (normally open).

Practically speaking let's say you have a fan that you want to come on at 40 C.  So you buy a 40 degree C switch that is normally open.  The switch then goes in series in the circuit from the power supply to the fan.  When it goes over 40 C, the switch goes to the closed position, and then electricity flows to the fan.

Each one of us who has even a minimal imagination can come up with many uses for a switch like this.  Consider your computer, or your Raspberry Pi, or some other device.  You can set up a fan to run only when the temperature limit is breached.

You can also think of situations where you want a device to run until the temperature rises and then you want to stop.  Or perhaps you want something to run when it gets too cold.

In my shack, I have a particular purpose for this versatile little switch.  I cannot stand the sound of the fan that I have installed in my homebrew amplifier running all the time.  So, I can use one of these switches to sense the heat of the heat sink close to the rf finals.  Over a certain temperature, the fan will kick on until the temp cools.  This way I don't have constant fan noise.

Another use might be in the field when you are in warm conditions and you need to keep certain gear cool.  At the same time, you have limited battery power, so you only want to run the fan when you must.  The thermal switch will then decide for you when to flick the fan on or off.

I am intrigued to know what use for which you might consider using such a thermal switch.  Please send me your ideas.  I would love to hear what applications you can dream up.

73 Mark 4x1ks


Monday, December 10, 2018

Cheap stuff from China...the Good, the Bad, and the Ugly

Howdy all.  Well as a Ham who can't stop tinkering, well I need parts.  Parts, Parts, more Parts.

There is a website called aliexpress.com which many of you may already know about.  It has a tremendous selection of Chinese (and even other countries products).  When you think Chinese, you may think "ugh, cheap junk."  However, this may or may not be true.

Let's look at a few examples of some Chinese products and how they measure up.

First, because it is the last thing I received lately, let's start with my 100 volt 50 a voltmeter / ammeter.  This little guy is digital and it sucks.

A $3 volt ammeter from China

Here is why it sucks.  I purchased this meter to be a panel mount meter on my 140 watt homebrew amplifier.  Naturally, I purchased a matching 50 amp shunt.  So first, I ordered the amp in red / blue, but I received red / yellow.  Then I discovered that the voltage and current will read current up to 10a without the shunt, but with the shunt, the amp reading is way off.  For example, at 15 plus amps of current, the meter reads 0.65 amps.  I then tested the voltage reading on a lab power supply and discovered that the actual voltage was, for example, 9.0 vdc, yet the meter read 7.2 volts.  

Some meters from China feature adjustment potentiometers to calibrate voltage and current.  This one doesn't, so what you receive is what you get.  This is probably the biggest mistake when ordering from China:  check out competitive products to see if there is any significant feature and quality difference.

So, this meter is essentially a sad sack that will probably be used with some QRP transmitter project just to provide a reference.  I may be able to modify the circuit by added an external resistor where needed, but that will require some experimentation.  One can use a potentiometer externally to find out a specific ohm value that can be used to modify the display. 

How's about some other Chinese goods.  Well, I cannot argue with the prices of semi-conductors.  I have purchased many different transistors and they have all been fine.  Connectors?  generally no problem.  Knobs?  Not so great.  I ordered a bunch of panel knobs that have a white line in the switch.  The knob from Dan's is first-rate.

A high quality knob received from Dan's Small Parts


A Chinese Knob 

If you notice, the Chinese knob looks like the paint job was done in a 2nd grade classroom by visiting 1st graders.

Some things have really been unexpectedly good.  For example, 12vdc relays, a set of step drill bits up to 32 mm, some really nice metal cut letters and numbers for a front panel, a rear brake disc and caliper for my grandson's go-kart that I am building (not specifically a ham radio project unless I put a vhf/uhf mobile in his go-kart),  a Nextion 2.4" display which was a tremendous value, magnets and springs for a homebrew iambic paddle project, and a Dremel type drill kit.


The Dremel tool is particularly handy since it is invaluable when working with small mechanical aspects of your latest project.  Then there are these:


Alligator clips that I wouldn't recommend to ANYONE

What could be bad about alligator clips at a price so low that you can't believe it?  Well, I happen to think that alligator clips are pretty dang important.  They should work perfect EVERY time.  These clips are cheap, and they are better off being tossed then used for 3 reasons.  1) The use of silicone plastic or some similar type of plastic makes these darn things almost impossible to use.  They just keep slipping in your fingers. 2) they are not soldered...they are crimped and are crimped so poorly that they are ready to fall apart at any time. 3) the teeth won't grab small wires and leads.

What is the point of all this?  Buyer beware.  The product might only cost $1.08 or $0.85 or whatever, but if they stink, then you will have waited for 30 days for the things to arrive only to discover that they are not fit for your shack.  On the other hand, some products are really excellent, so it appears that even in the same product catagory, you can have 2 manufacturers that produce the same product where one is just fine, and the other is pathetic.

So how do you tell?  There is no sure-fire way to know if that thingy that you are ordering from overseas is going to work just fine for  you.  However, with Aliexpress, you can click on "orders," and then the company that has the most units sold will be at the top of the list.  Then you can look at their stuff and decide if it looks okay.  Some of it is also common sense, and when it comes to  critical components; they should only be purchased from a reliable source.


Collins KWM-2 PTO 

Above is a KWM-2 PTO from one of my Collins rigs.  Rebuilding this PTO is a scary and difficult job, and replacing all of the silver mica caps is not easy.  There is NO WAY you do this job with parts from a unknown manufacturer or vendor.

The bottom line is that if the product is simple and cheap and you cannot not find it in your country for a fair price, then buying from China might be a solution.  Keep in mind that you will wait 3 weeks or 5 weeks or longer to receive your order depending on the product.  The good part is that if they send you something that is DOA, then they will refund your money...and SHIPPING is quite often FREE.  So build those projects and try to get your parts locally, but when in need, consider ordering from overseas.

73, Mark 4x1ks


Wednesday, December 5, 2018

Push your limits by making homebrew stuff....

Decades ago when I became a licensed operator, I discovered a wonderful thing about Ham Radio.  Specifically that amateur radio is possibly the most multi-disciplinarian pastime or hobby.  Every ham knows exactly what I am talking about, in that with our hobby, you can go in so many different directions that it is nearly impossible to do everything.

Let's start with the basics.  The main things with think of first are electronics, operating, antennas, digital modes...and so on.  However, like the hams of 80 or 100 years ago, we can also make all our own equipment.  This includes mechanical devices as well as soldering together a small transmitter.

So when it comes to homebrew, it makes sense for us to push ourselves to try new things to add to our stations.  Years ago, about 20 years perhaps, I purchased a small milling machine and a lathe.  I had no clue as to how to use them, but I knew that I wanted to be able to machine small parts.  Naturally this led to using my mill and lathe to make parts for my station.  Like many hams who invest in metal working equipment, I also wanted to machine Morse code keys and paddles.  So with some practice (and many failures), it was possible to begin making parts for non-ham friends, which gave me more confidence to try building keys.


My first decent iambic key that is currently in my truck

Of course, there are things that you just cannot do with small and simple mills and lathes, so I recently purchased a Begali Sculpture which really demonstrates the ART of fine metal work. 

The Begali Sculpture

The truth is that building a key like the Begali Sculpture is out of reach for nearly all hams. However, it is possible to create some really nice keys if you use your imagination and take the time to figure out what you are doing.  

My latest key project is my most ambitious yet, and I write this, not to just talk about my projects, but to encourage others to try to make new things in your own home shop.  Regardless of how elaborate your tools are, with a little energy and effort you can build some interesting things that work, such as antennas, baluns, center-conductors, project boxes, and lots of other things.

Below is a picture of a raw piece of brass that will eventually become (hopefully) a nice iambic paddle that is built with magnets and nice bearings as opposed to using springs.  The bearings and magnets were ordered from overseas, and the prices were fair and the shipping free.  It is very possible that in your country you will be able to find parts fairly easily.


Being that I don't have a full-size milling machine, so I am stuck with having to use a little creativity to figure out how to hold and work with a piece of brass larger than my Sherline mill is really designed for.  When it comes to keys, I learned something important from the Begali key.  The Begali key is HEAVY.  Heavy keys don't move around while you are sending dits and dahs.  So I got a large and heavy piece of brass.  This piece started out at 2.7 kilograms (that is just under 6 lbs).  The plan is to cut this down into a rectangle that will weigh in at about 4 or 5 pounds.  That is a big chunk of brass.  In my case I decided to cut grooves in the brass so that I could use hold-downs to secure the heavy brass work piece while I prepare the surface.  Necessity is the mother of invention, so sometimes you have to come up with solutions that will work with what you've got.

The point of this particular blog is not to suggest that you start making keys.  There are lots of projects out there to choose from.  During this low sunspot cycle when activity on the air can be a little off, still there is plenty to experiment with, and whether it is mechanical or some other experiment or construction project..just get out there and do it...especially if it pushes you to try something a little out of your comfort zone.  BY THE WAY, I would love to hear about something you have built or are planning to build.  Your clever ideas are very much appreciated, so feel free to comment about your projects or send me an email.  73, Mark 4x1ks


Tuesday, December 4, 2018

You thought Peanuts was a cartoon? Guess again.

Well it appears that the modern cellular telephone is making inroads into amateur radio in a significant way.  For those of you who use the Allstar Network, you may already be familiar with Zoiper and Iaxrpt as methods to get into the Allstar Network using your cellphone.

Here's a very brief summary of how Allstar via your cellphone works:  You install Iaxrpt or Zoiper (or some other emulator), and you fill out the settings menu with the 5 or 6 fields that need to be filled out.  These fields tell your application (e.g. iaxrpt) where to connect.  You will be connecting to a node, such as 2360 (the WIN system), or some other node, perhaps your own node.  From there you can then connect to other nodes anywhere in the world. 

Whereas this is not strictly ham radio, most nodes are linked to radios that have antennas that transmit on VHF or UHF, so you must have an amateur license if you are talking on Allstar.  The network is vast, and you can connect to nodes all around the world.

This concept of using a cellphone to connect to Allstar has now set its sights on D-Star with a program application called Peanut.

The Peanut Android Interface

David, PA7LIM, put together this application so that you can get into D-Star from anywhere you have a cellphone connection.  Currently, there are a limited number of D-Star Reflectors that are available. These include REF001C, REF030C, and several others.

Peanut will not run on iPhones at this time.

The upside of this software is clearly that you will be able to access D-Star as long as your android phone is in cellphone range.  Many hams will be very happy to have this additional method of getting into  D-Star.  I must say that my original reaction upon hearing about Peanut was a bit negative.  I felt like the "ham radio" aspect of D-Star was being watered down.  It is too early to say how Peanut will improve or perhaps damage D-Star.  

When I think back on my introduction to Allstar, I did not have a node of my own initially, and the only way to get into Allstar was to use my cellphone and Zoiper to access my friend's node.  From that perspective, the introduction of Peanut serves a similar purpose in allowing folks without a D-Star radio to get onto D-Star without the expense of buying a D-Star rig.

Will this mean the demise of D-Star radios?  Time will tell, but I believe that hams like their radios, and so those D-Star radios will continue to be the main method of getting connected.

The popular Icom ID-51 D-Star / Analog handhelds

I think there is much more to be said on this topic, but for now, see the link below to the PA7LIM website so that you may investigate the Peanut option for yourself.  In my case, I downloaded the app, and requested a Peanut "code" which was sent back to my email within minutes.  I soon was listening to Ref001c and the audio was outstanding.  I think I like the option of using my cellphone, but like I said before, the jury is still out as to whether Peanut is a good thing, or just "food" for thought.

Link for the PA7LIM is found HERE.

73, Mark 4x1ks

Sunday, December 2, 2018

$10.74 including shipping...but is it worth it?

Did you ever have a capacitor that you wanted to measure and it was marked poorly or you had your doubts about whether it was good?   Perhaps you have an inductor that is unidentified.

Well for $10.74 you can buy a ready to go L/C meter.  It is truly hard to believe that you can get something to measure Capacitance and Inductance for under $11.

Here are some examples:

The little LC meter that could


I took 4 inductors like the one in the picture above.  I measured them as follows:

1.04 uH
0.989 uH
0.998 uH
1.07 uH

Frankly that is pretty good.

Capacitors were a little more problematic, but for the most part they measure close enough.  A big 100uF electrolytic measured dead on.  Interestingly, a silver mica measured outside the plus / minus 5%...not sure about that one.

*However, guess what?  For those unmarked air variable caps it is REALLY HELPFUL*

So for inductors, it appears absolutely brilliant.  I have a whole drawer of unidentified inductors that I can now find their values without have to take the time to set them up on the scope.  

By the way, if you do want to do an experiment in measuring capacitance using your oscilloscope, then there are several instructional videos on youtube that are quite fun.  You can take an unidentified capacitor and use your function generator to calculate the unknown capacitance.

Ok, so as far as buying an $11 inductance capacitance meter, well I think it is worth it.  Particularly for those unknown inductors and also for those capacitors that you have your doubts about.

Short blog for today, but I think I will go play with this little meter some more.

73 Mark 4x1ks

Saturday, December 1, 2018

The Saga Continues...

Here's a brief view of the next steps in the Sotabeams Variable Bandwidth Filter use.

This is the very plain-Jane external amplifier circuit that I put together to test the filter using an external speaker as opposed to headphones.


The little LM386 audio amplifier circuit tacked together.

Well, my thoughts on the use of an LM386 as an external audio amplifier are mostly mixed.  The audio is there in terms of amplification.  Most of us who have used the LM386 know that it works as advertised.  The downside is that the audio is poor.  The specs on the LM386 just aren't going to give you the kind of audio you are looking for to follow the output of the Sotabeams variable filter.  You, like me will want to hear some full audio like something close to the audio that you get when using earbuds headphones with the Sotabeams filter direct.

I can say in retrospect that the filter used with decent earbuds is pretty adequate, and the filter works as advertised.  If you want good external speaker audio, then you will need to come up with something a little more elaborate that the LM386-based external audio amp.

Press HERE to see a short video clip of the LM386 audio to an external speaker.


Here is the very simple circuit from the Radio Shack Engineer's Mini-Notebook series by Forrest Mims, III.  I recommend building this circuit just for fun if you are new at playing with circuits and want an almost "no-fail" little project just to have fun.  As hams, we should be building circuits (in my opinion), to keep up our skills and experimentation.


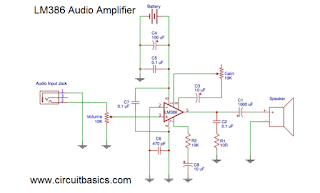
The above circuit is simple and easy to build, and you can use it to amplify low level audio.  It is also fun to build with your kids or grandkids to teach them something practical that will let them say "I did that!"  Below is an improved LM386 circuit that I found at circuitbasics.com   I have not built this circuit yet to test it out.


A possible LM386 circtuit that is designed to have better audio


Obviously, I feel strongly that to use an external amp following an audio filter like the Sotabeams variable filter...well it needs to be a little more "full bodied"than using an LM386.  I would be curious to hear about your ideas for a 9 to 12v small audio add-on filter for the project that could kick out a little stronger audio.

73, Mark 4x1ks

Wednesday, November 28, 2018

UPDATE on today's earlier blog about the Sotabeams filter

Ok, so I just built the filter into a custom enclosure.  Here is what it looks like:


The box has 3 LED indicators and a control knob.  Below is what it looks like inside:

A mass of spaghetti, but all that being said, how well does it work.  Here are my impressions:

1. The audio output with the existing on-board audio amplifier is fairly meek, and almost unusable without external amplification.
2. The external amplifiers that I tried both picked up some noise which I have not determined the source yet.
3. The audio sounds a little hollow, but it isn't a brand new $1000 receiver.
4. With all that being said, the bandwidth filter and the center frequency function as described.  It is a pretty cool little device.

In summary, I really don't see how this is going to help someone working QRP.  Chances are you are going to hear whoever you are working quite well without any filtering.  On the other hand, if you use this filter in a LP or HP situation, then the benefits of being able to control the bandpass is going to have some bang for the buck.  In my 3 quick QSO's on 40m CW,  I was able to reduce the bandwidth in small steps and the received signal was more pleasing to the ear.  The Center Frequency feature definitely moves the hi and low cut quite adequately.  For some reason the direction of the knob feels backwards, but that might have been a wiring error on my part..but I don't think so.

I noticed that one of the chips on the board seemed to run a bit hot, but probably within acceptable limits.

Would I recommend it?  A definite maybe.  If you operate in crowded band conditions, then it could be a real help.  For every day QSOs it might not be necessary and you may not bother to hook it up unless you have a cacophony of signals coming at you on a regular basis.

It was not completely easy to get everything into the small box...mostly that is due to wiring it up.  I would probably build it differently if I do it again...for example, I would want everything mounted on one side of the enclosure to avoid wiring from both top and bottom.

If you decide to build one, let me know how it turns out.  You will need an external audio amplifier to give you more audible output.

73 Mark 4x1ks
Wow! Look what came in the mail today!!!!

The Sotabeams Laserbeam-Vari  -   Variable Bandwidth Filter

Yippee!  I've been waiting a while for this little gem to show up, and now it is here.  The Sotabeams Laserbeam Vari is a variable bandwidth filter that is designed to give you control over your receive audio bandwidth and center frequency.  The instructions and specifications are found here 


Here it is!!!

Okay, so the filter is here, and you may be asking: "so why do you need an audio filter if all the modern radios have bandwidth and other fancy filters?"

A) Well, a lot of us, probably most of us have some rigs that don't have very advanced audio filtering.  For me, that is my K2 (and others).  My Elecraft K2, which is a really outstanding 10w radio came as a kit back in 2001 or so.  It has user customizable filters (actually 4 bandwidth choices), that the user can program.  I set up 1.5, 1.0, .50, and .30 bandwidth filters as my current choices.  

However, bandwidth alone is not the only issue, and here is where the Elecraft K2 needs a little assist.  The help I am talking about is he ability to shift the center frequency away from adjacent noise sources when I am listening to the K2.  The Sotabeams Laserbeam Vari should be very helpful with this issue, and so that is where the filter will hopefully prove itself worthy of the modest price tag of 37.46 British pounds.  If you buy it and ship it out of the UK, then there is NO EU TAX.

The Elecraft K2...one of the greatest kits ever made

I am going to build the little audio filter tonight, but in the meantime, it is really worthwhile to watch this excellent video on testing the Laserbeam-Vari.  This video convinced me to plunk down the cash to buy this filter.  Click here to watch the video.

I will try to let you know how it turns out and also post a pic of the filter in it's enclosure.  I am also wondering how this filter would work with my Collins KWM-2 radios and other older rigs...so stay tuned.  73 for now, Mark 4x1ks

Monday, November 26, 2018

The Gentleman's Band is for you!!

Hello all.  Well, CQ Worldwide 2018 CW is now history.  The activity was fast and furious.  The big guns were pounding the keys and generating big numbers.  They know who they are and if you were listening, then you know who they are.  The rest of us "normal" people are happy to make a bunch of QSO's, and perhaps add a new country, mode and/or band to our log.

Necessity is the mother of invention, and so I must tell  you how I discovered something pretty darn amazing.

Saturday evening I began operating on 80m.  The atmospheric noise was loud, and making QSO's was not a breeze.  I was a little despondent, then I decided to take out 15 minutes and do something I had not done to improve reception.

A few years ago, I purchased a magnetic loop antenna for receiving because of the noise that was relentless in my area.  Since then for some unknown reason things have actually gotten quite quiet here.  No longer do I have S5 noise that won't go away.  However, at the time, I did a little research and saw some good reports on using a magnetic loop for receive. 

So I ended up purchasing a Wellbrook magnetic loop without the loop.  How do you use a receiving loop without the loop?  Actually you don't, but there was no way I was going to ship the whole thing to Israel from England, so I bought just the "guts."  Someone traveling brought the parts and "active" amplifier unit, and making the loop was up to me.

A Wellbrook box and loop antenna

Fortunately, there is a nice aluminum supplier in Tel Aviv that has all different size tubes.  I loaded up a 6m long tube on top of my truck and drove all the way back to my home QTH (about 15 miles away) with the tube bouncing and swaying in the wind.  But we made it!

Once home, I proceeded to bend the tube, not into a loop, but into a square.  My square "loop" is actually larger than the original round loop, and the chief at Wellbrook actually thought that my square loop would have some advantages over the smaller round loop.  I put it all together and prepared myself for magical receive capabilities.

Then the truth hit.  On the upper bands, the loop is a wash.  In fact, I didn't expect great results on the upper bands, but I did hope for lower noise...but not so much of an advantage there.  Granted, the ideal location for a magnetic loop is close to the ground and away from structures.  The truth was that I was really looking for a big improvement on 80m.  To this end, 80m turned out to be okay.  In some orientations, the magnetic loop does provide noise reduction and better ears on 80m, and that is why I set it up for the CQ WW CW  on last Saturday night.  It was an experiment, and I did not intend to work the whole contest using the loop for receive, but it did prove that 80m with the loop can have some advantages.


All of this is a preamble, because the real story here is all about TOP BAND, 160m.  For a little fun, I had set up my Wellbrook loop with my SDRplay and the receiver.  I also installed the latest SDRuno software complete the receiver setup.  The loop was put up on a small mast on my 3rd floor patio and all was set up as required.  The loop had not been used in about 18 months, so I had no clue as to what to expect, but the rainwater leaking from the aluminum tube did not inspire confidence.

So, with the software SDRuno up and running I first checked 80m, then, just for fun, I tuned to 160m around 1.820 mhz.  The SDRuno software shows you a user-defined chunk of the band.  Let me tell you that the audio was nothing short of astounding.  160m was absolutely pristine.  The signals were well-defined, and band noise was minimal.  It was absolutely unbelievable.  If you would like to see the SDRuno video, press here.


A screenshot of the SDRuno software

I immediately committed myself to figuring out some way to put together a 160m transmitting antenna.  The receiver for the "Gentleman's Band" is hands down going to be the Wellbrook magnetic receiving loop.  I cannot describe to you how wonderful the receive audio was with this antenna.   No doubt, coming up with a 160m tx antenna is not easily solved if you are limited in space.  However, there are vertical solutions and perhaps other wire antenna solutions that will give you some level of TX ability on Top Band.  Maybe in a future blog I will explore 160m transmitting antennas.  For now, suffice it to say that the receiving issues like high noise levels are (in my opinion), significantly improved with the use of a receiving loop. 

Keep in mind that you must try to locate the receiving loop away from the TX antenna.  You can NEVER transmit into the receiving loop or you will destroy the electronics in the amplifier box.   You could experiment with a separate receiver, or to run the loop to your computer directly with an SDRplay or similar computer-based receiver in between the antenna and the computer.  Your results may vary, and the best setup needs to be determined based on your particular rig situation.


The above link will take you to a youtube video by Z33T, Mike Kokotov using SDRuno to listen to 80m.  You will see the spectrum display and hear the clear signals.


I always thought that 160m is out of reach, and whenever I would tune a compromise antenna on Top Band, all I would hear would be a lot of noise that was just too difficult to work around.  Following my test on Saturday evening (November 24, 2018), I am determined to give the Gentleman's Band a go.  Next is to solve the transmitting antenna problem.

73 for now, Mark 4x1ks


Saturday, November 24, 2018

CQ WW CW....

Due to CQWW CW Contest, the blog will be hibernating until Monday...Good luck in the contest if you are participating.  73, Mark 4x1ks

Thursday, November 22, 2018

The Zumspot Zumbox...a fun project that is ready to ZOOM!

Happy Thanksgiving Everyone!

Today's blog is about my new Zumbox.  This is a custom enclosure for you Zumspot - Pi-Zero combination.  I've been planning on making a compact box for the Zumspot for a while now, and finally all the parts came together.

If anyone is interested in building this box for you Zumspot, then comment below and I can give you a parts list and instructions.

Firstly, here is the finished product:

Zumspot with 2.4" Nextion Display...Customized with my KWM-2

Being that everything is combined into one box, the only part not "in the box" is power.  Power is a 5v battery or power supply connected to a side mounted USB port.  From there, the screen and the Zumspot / Pi-Zero are powered up.  You can use any battery you like.  I use a Romoss Solo 5 10,000mah battery that has 2 usb outputs. This allows you to run your Zumbox and at the same time, power your cellphone.  The dimensions of the finished box is 134mm long (5 7/16") x 88mm wide(3  7/16") x 45mm high (1  3/4"). 

Of course, the cellphone and a decent cellular connection is critical.  You must set up your phone for Mobile Data, and the phone should be up and running before you plug in the power to the Zumbox.  The Zumbox will boot up and in short order your Zumspot will be connected.  My Zumspot is set up for D-Star, DMR, and P25.

The USB port mounted on the side panel of the Zumbox

As I write this, I am listening to D-Star reflector ref001c.  I am listening to a G6 station conversing with a KE8 in Wisconsin who is working mobile in the snow on a brisk Thanksgiving afternoon in the USA.

A wonderful feature of the Zumspot with Pi-Star software is the ability to see what is going on from the screen of your cellphone.  Here's the trick to seeing the Pi-Star software interface in case you don't know.  Go to your mobile hotspot and tethering menu on your android phone.  You will immediately see the Zumspot listed as most likely a device connected to your phone and call "PiStar" with an IP address underneath.  For example, your Zumspot address might be 192.168.40.50  or some other address.  Simple go to your browser and type in the IP address in the browser and hit enter.  You will be directed to the Pi-Star software and will need to enter your user name and password.  The default is pistar and raspberry, I think.

There are many optional settings in the Pi-Star software. Much too much for this blog, but the basics are not overwhelming...just stay out of EXPERT mode until you know what you are doing, and then use Caution.

My Nextion 2.4" display 

Building this project requires some use of tools, minor SD card programming or the Nextion Display, and use of Nextion Editor if you want to make a custom display.  You can use any box that you have available, or you can order one.  I chose the smallest possible box that I could find that could also fit every thing in there.  There is still room for one additional piece which is a small 5v fan that might be necessary if the Zumspot gets to hot when out traveling.

A small screenshot of the Nextion editor

As I mentioned earlier, if you are interested in building the project, then comment with your info (e.g. email), and I will try to answer your questions on how to acquire the parts and make your Zumbox ready to go, go, go !!!

73 for now and Happy Thanksgiving. We are have 26 people here in our home in central Israel.  Two medium-size turkeys and all the trimmings. Yum!  Enjoy! Mark 4x1ks

Wednesday, November 21, 2018

What to do with that old HT you used to love so much...

If you are a ham for at least 10 years, then chances are you might have an old HT laying around that doesn't see a lot of use.  It seems that more and more, we are using our D-Star handhelds, our DMR radios, and other HT's that are combos of digital and analog.  That leaves a lot of HT's unused and gathering dust.

Besides being replaced by new "fancy" radios, why might that old HT be just sitting?

I can go though a few experiences of my own and perhaps they will align with yours as well.

1) The battery pack is NiCad. It is pretty much dead and won't take a charge.  I won't toss the radio, because it is a good radio that has a power problem.  Ok, so there are some solutions here.  Let's consider my Kenwood TH28
Kenwood TH-28

In the past, I purchase replacement batteries for this little radio.  They worked fine for a while and then they too bit the dust.  The radio, however, was and is still fine, so when I saw the prices of the new batteries, I couldn't justify that kind of expense for a radio that will not see much use.  BUT there is an alternative.   You can get yourself a standard battery pack.

The battery pack takes 6 standard AA batteries.  I bought mine from overseas because I was not in a hurry.  The batteries were very difficult to insert, but I managed to get them installed, and the pack was cheap.  Now the TH 28 is powered up and ready to go.  We even used it on a special event site recently for communications between stations at the site.  Works fine.

2. The second reason that the older HT might be on the shelf could be because of mechanical issues.  My Kenwood TH79a was a great example.  The antenna mount inside the radio was always mechanically "weak," and it required me to disassemble the radio and do surgery on it.  Unfortunately, although this worked for a long time, eventually the radio just wasn't a good long-term radio and other things broke.  With a radio like this, I had no choice but to do something I despise doing:  I tossed it.  The battery went to the recycler, and that's that.

3. Some radios are just too unique to get rid of.  I have at least 2 handhelds like this.  The first is the Icom Delta 1A.  This is a tri-band HT with 2m, 440m, and 1.2 ghz.  What a rare radio.  The battery packs are long dead, and it is near impossible to find a new one.  With a radio like this, there is only one solution that I can think of and that is to rebuild the battery pack yourself.

This can be a daunting task, because you must open the radio and disassemble the existing battery pack, then replace the cells with something that fits that are NiMH or Li-ion, and you must be sure to have a charging system that will work with these new cells.  If you do it correctly, then your old-time classic will have a new lease on life.
The Venerable Icom Delta 1a

I have another rare Icom that also has a battery issue, however this radio's batteries are still available if you hunt around.  The radio is an Icom IC-2SRA.  This was a really interesting HT, because it has 2m plus it also is a separate antenna for a receiver that covers 25 thru 950 mhz.  You can also rebuild the battery pack on this one if you are motivated.


The Icom IC-2SRA

4) No one is talking on VHF or UHF analog.  Well, I hear you, but I think that is not entirely true.  There are plenty of analog repeaters out there and in fact, analog audio is just a lot better than digital audio almost always.  Perhaps P25 is the best of the digital audios out there, but P25 is pretty rare on the air.  

And then there's Allstar Network which is analog and is bulletproof if you set up your own node correctly.  You can use that Analog and ancient HT to work on Allstar as long as you are in range.  You can also set up DTMF tones to get Allstar to connect to other nodes that you want programmed into your HT.  A lot of people don't know much about Allstar, so in a future blog I will attempt to break it down for y'all.  

Finally, there is always charity and mentoring.  There are Hams out there that do have access to an analog repeater, but could use an HT because they don't have the spare cash to buy a new one.  When I think about using an old Kenwood or Yaesu HT to work my nearby analog repeater, well that is definitely preferred over using a new Chinese radio any day.

There is also the possibility of getting someone more involved in ham radio by using VHF or UHF to get them involved in the local club or just as a means to becoming an Elmer to a newer ham.  I think back when I passed my Technician, and it was just great when I could find people that I met at the club meeting on the local (Memphis) repeater.  These folks helped be along to learn and improve my skills and to upgrade.  That old hand held of yours might find a lot of use in the hands of a newbie.

Recently I received a large and heavy dualband radio, the Icom IC-32AT.  This thing is the size and weight of a brick, but it has a real DTMF pad on the front panel.  There is no way a working radio like this is going to end up being shelved.  Perhaps at your next club meeting you should show up with a brick-sized radio on your hip.  Could lead to an interesting conversation about the old days.

73

Mark 4x1ks